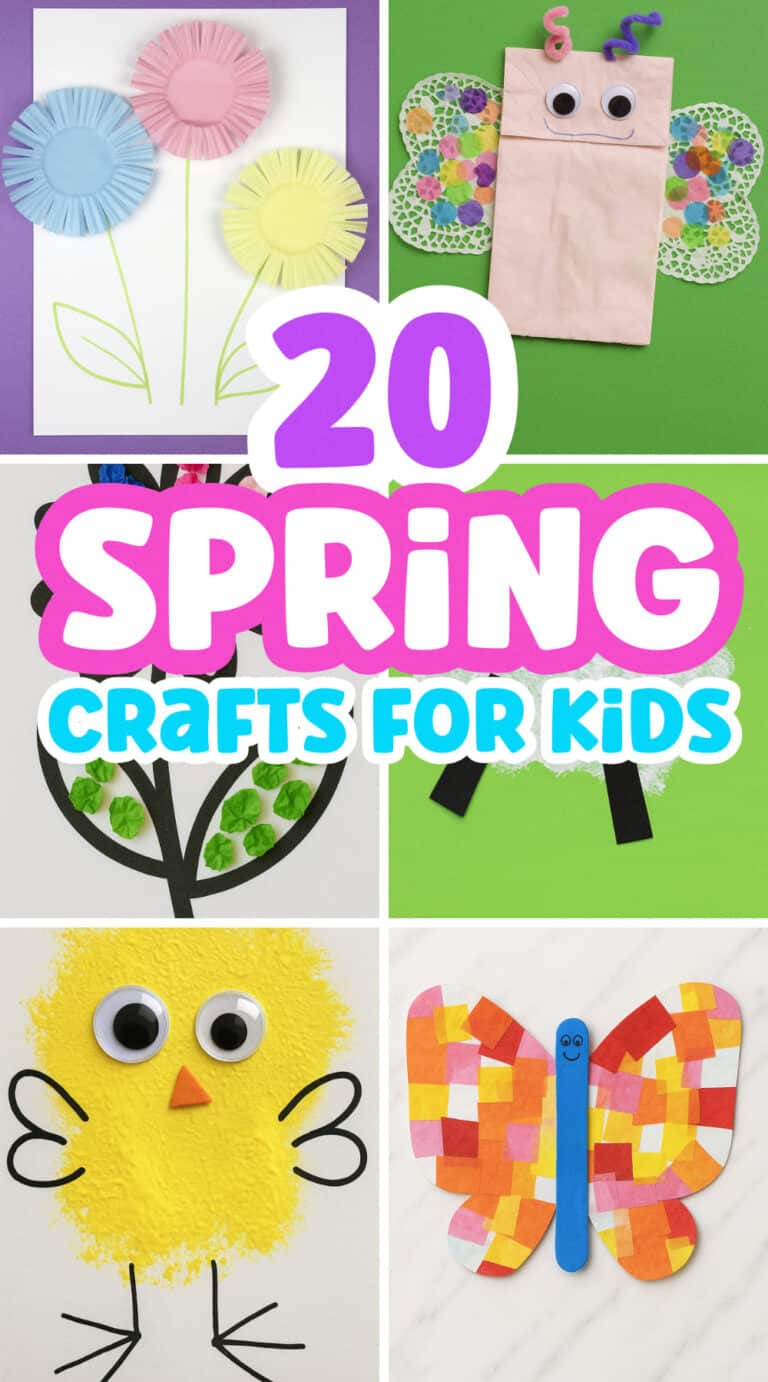
When my twins were toddlers, I absolutely loved all the little spring crafts they used to make.
There was something so sweet about tiny handprints turned into flowers, popsicle stick butterflies, and finger-painted everything that made our house feel extra cheerful that time of year.
Every spring, we’d pull out the glue, construction paper, and all the pastel colors, and they’d happily create the cutest little masterpieces, usually with a big mess and even bigger smiles.
If you’ve got a toddler at home, these fun spring crafts are a great way to keep their hands busy and let their creativity shine.
They’re simple to set up, use easy-to-find supplies, and make the best keepsakes.
I still have a few of their spring crafts tucked away in a memory box, and they always make me smile.
These little projects may seem small now, but they really do turn into the sweetest memories.
1. Handprint Bee Craft
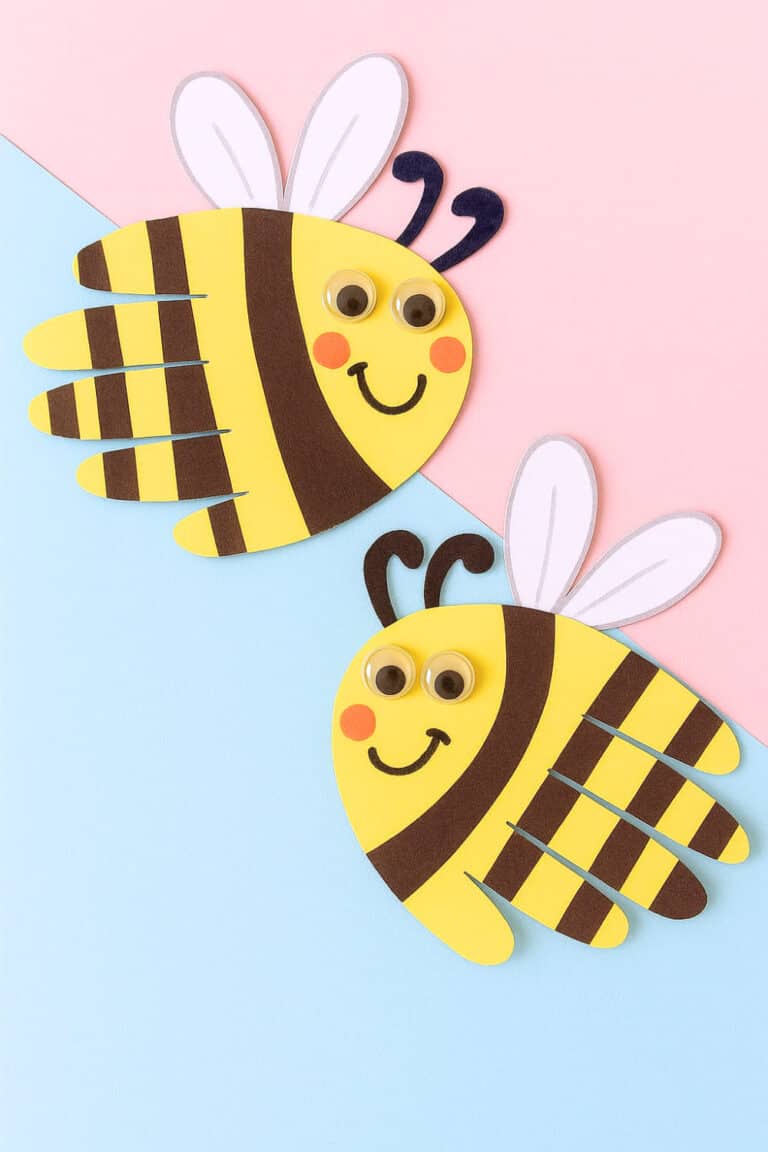
This adorable handprint bee craft has been a lifesaver during those rainy weekend afternoons!
You’ll need yellow, white, and black craft paper, glue, scissors, googly eyes, and sharpies.
Start by tracing your child’s hand on yellow paper and cutting it out for the bee’s body.
Add black paper strips across the fingers for stripes, then attach white wings to the pinky side.
Glue on antennae and googly eyes, finishing with a cute smile drawn with sharpie.
My daughter always insists on adding rosy cheeks and eyelashes too!
2. Caterpillar Craft for Toddlers
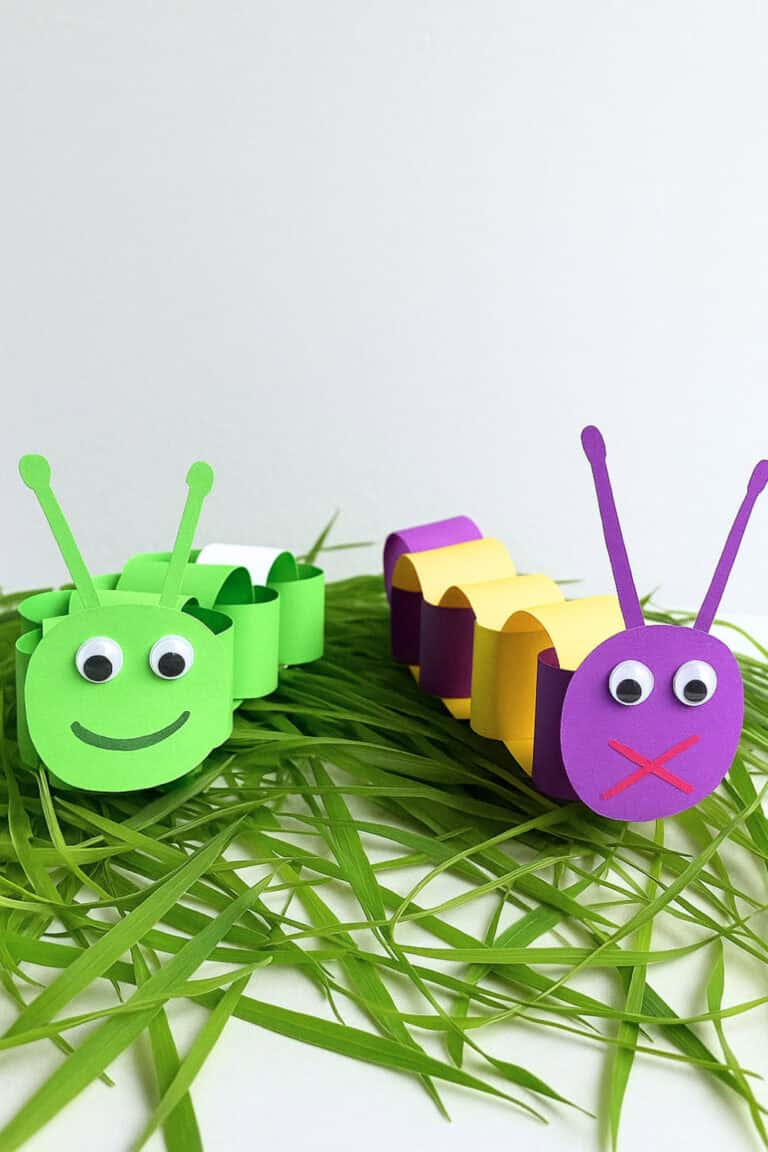
Aren’t these the cutest spring crafts for toddlers?
This paper caterpillar was my go-to rainy day activity!
You’ll need orange, yellow, and red cardstock, googly eyes, glue stick, and scissors.
Cut 5 yellow strips and 6 orange strips for the body, plus pieces for the head, mouth, and antennae.
Create the caterpillar by connecting the strips into rings, alternating colors as you go.
Glue the eyes, mouth, and antennae to the red head piece, then attach it to one end of your chain.
They’re super simple but was always a hit, and they look adorable hanging from the playroom ceiling.
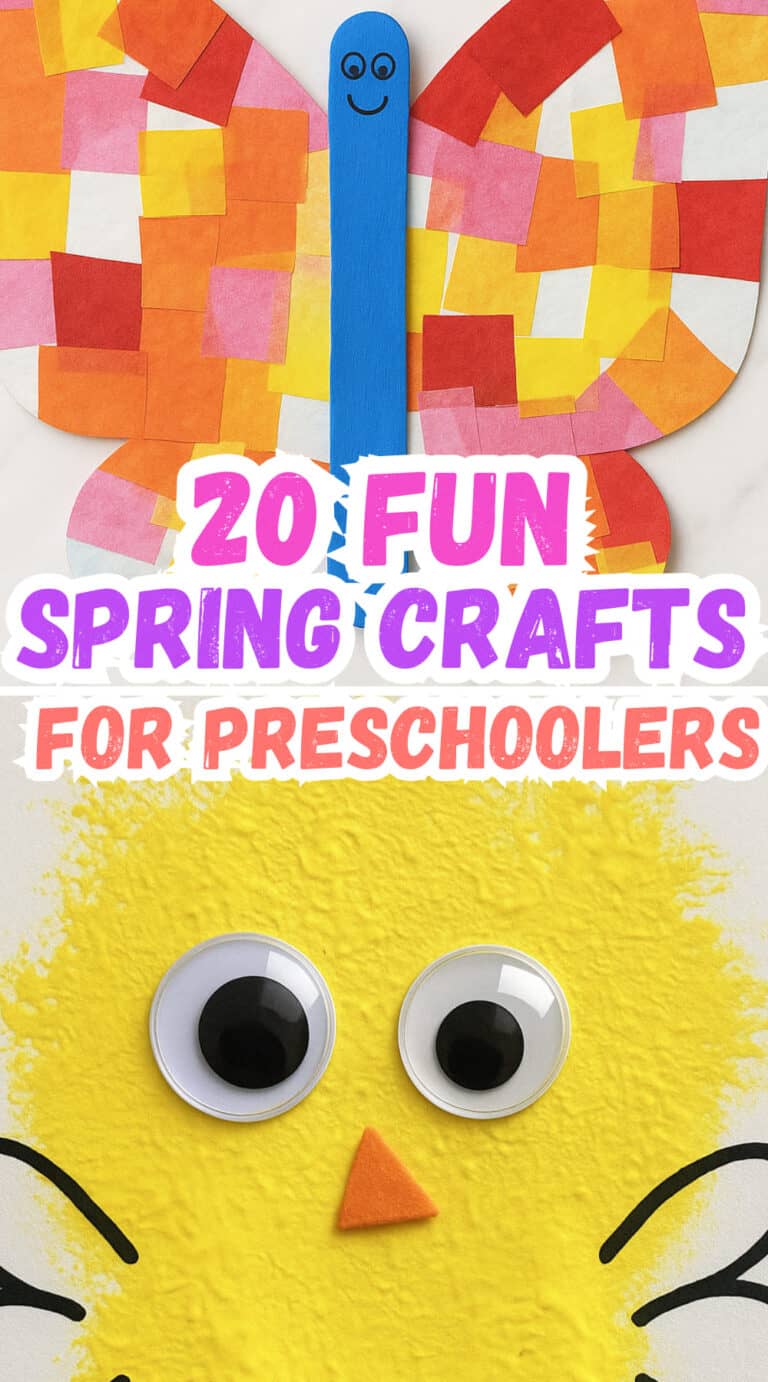
3. Spring Chick Craft
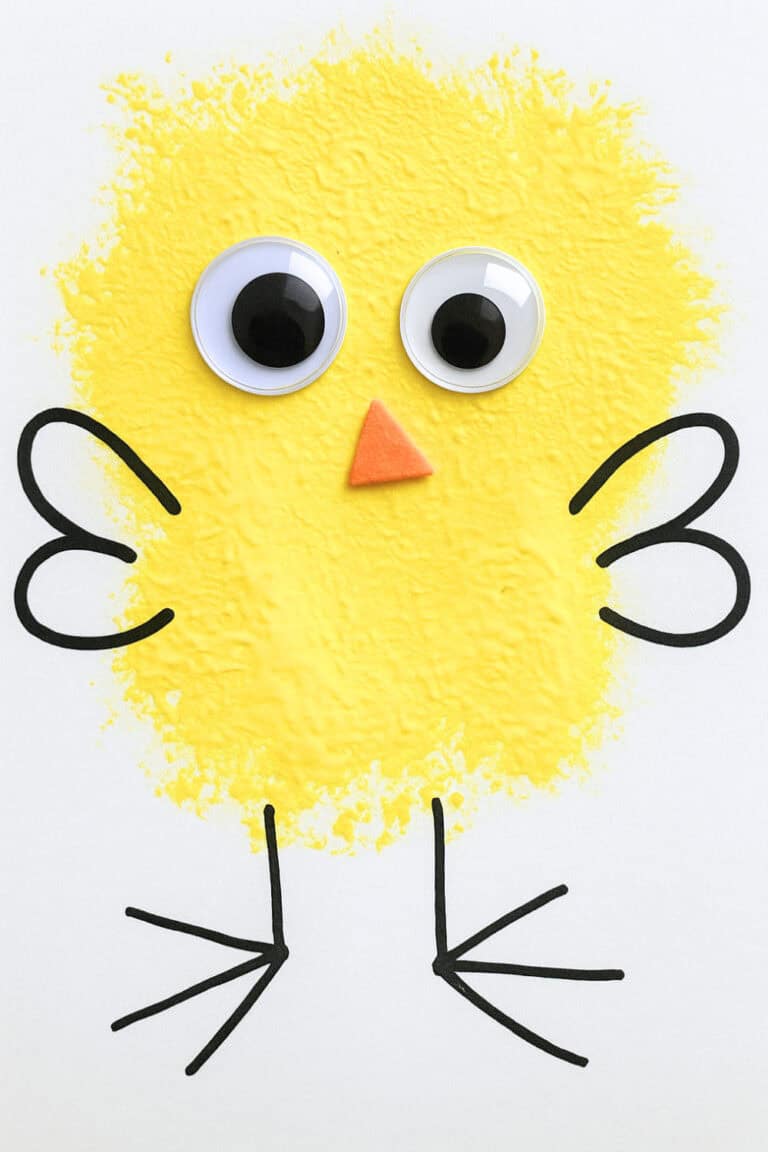
Looking for a quick spring activity that won’t create a huge mess?
You’ll need white cardstock, yellow paint, a loofah, googly eyes, orange felt/foam, a Sharpie, and glue.
Start by drawing simple stick legs with the Sharpie toward the bottom of your paper.
Then comes the fun part, dip the loofah in yellow paint and let the kids tap it onto the paper to create the chick’s fluffy body.
Cut small triangles from orange felt for the beaks, then glue on googly eyes and beaks.
That’s it!
4. Tissue Paper Flower
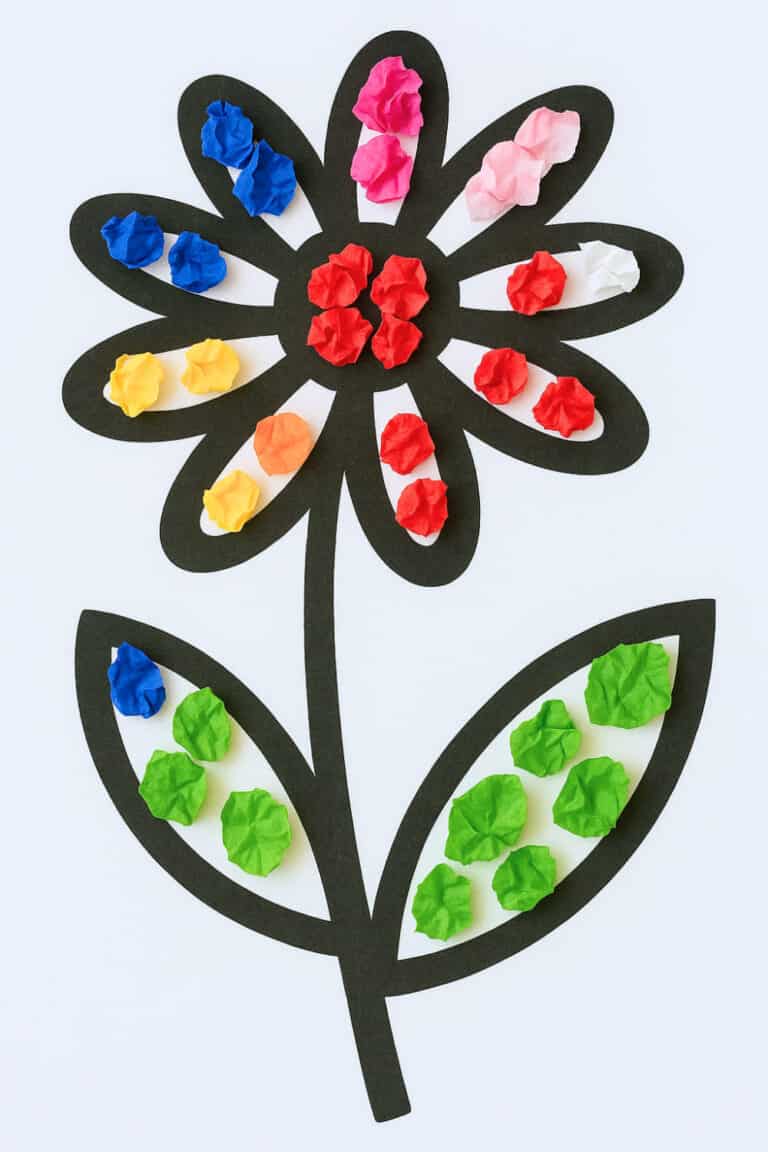
What a cute flower art craft your toddler can make for spring or Mother’s Day even!
You only need colorful tissue paper squares, glue sticks, and a simple flower outline on paper.
Kids just place glue on parts of the flower, scrunch up tissue paper squares, and stick them down to create textured, 3D flowers.
My twins enjoyed making rainbow patterns on a rainy days.
It’s perfect for developing those fine motor skills while creating something beautiful for the fridge!
These make adorable cards for grandparents too!
5. Beaded Flower Craft
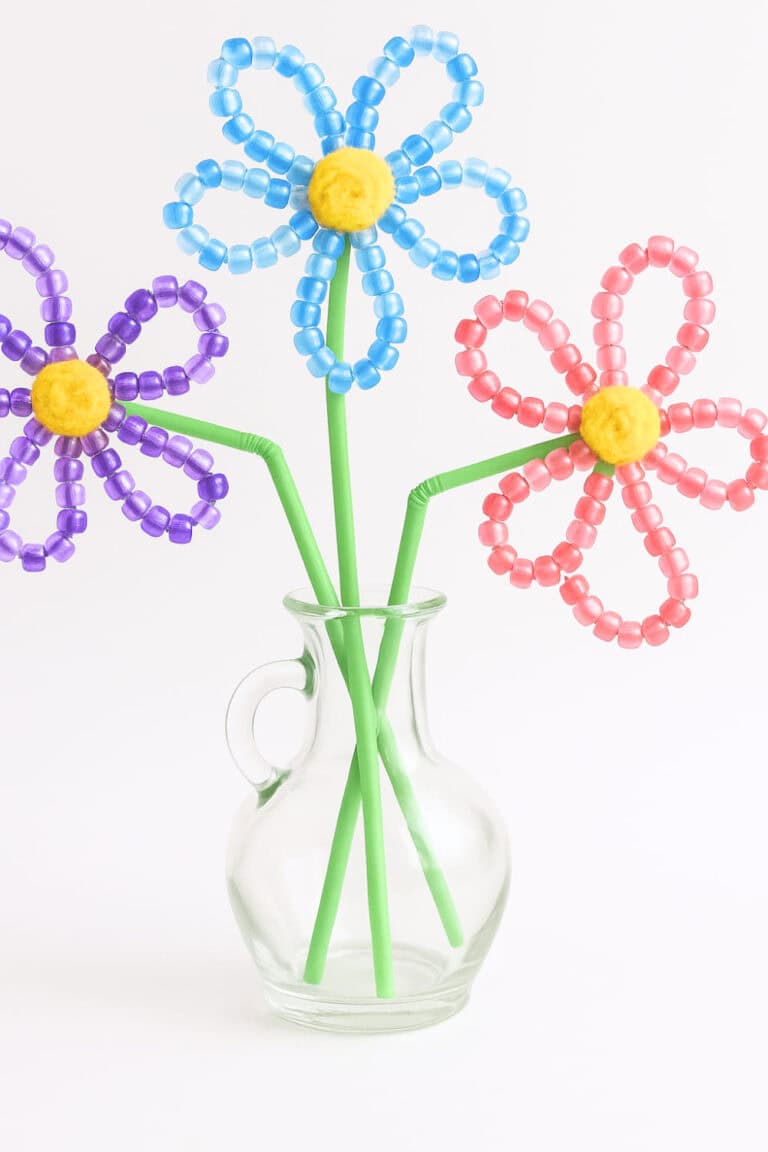
These beaded flowers have saved many spring showers afternoons at our house!
You’ll need 1 green pipe cleaner (12″), 5 colored pipe cleaners (6″), 1 yellow pipe cleaner (6″), and plastic beads.
Thread 8-15 beads onto each colored pipe cleaner, then twist the ends to form teardrop-shaped petals.
Attach all five petals around the green stem by twisting their ends tightly.
Use the remaining green end to secure everything by crossing it over and twisting down.
Finish by rolling the yellow pipe cleaner into a spiral for the center.
They look adorable in bendy straws as stems for a lasting bouquet!
6. Paper Plate Butterfly Craft
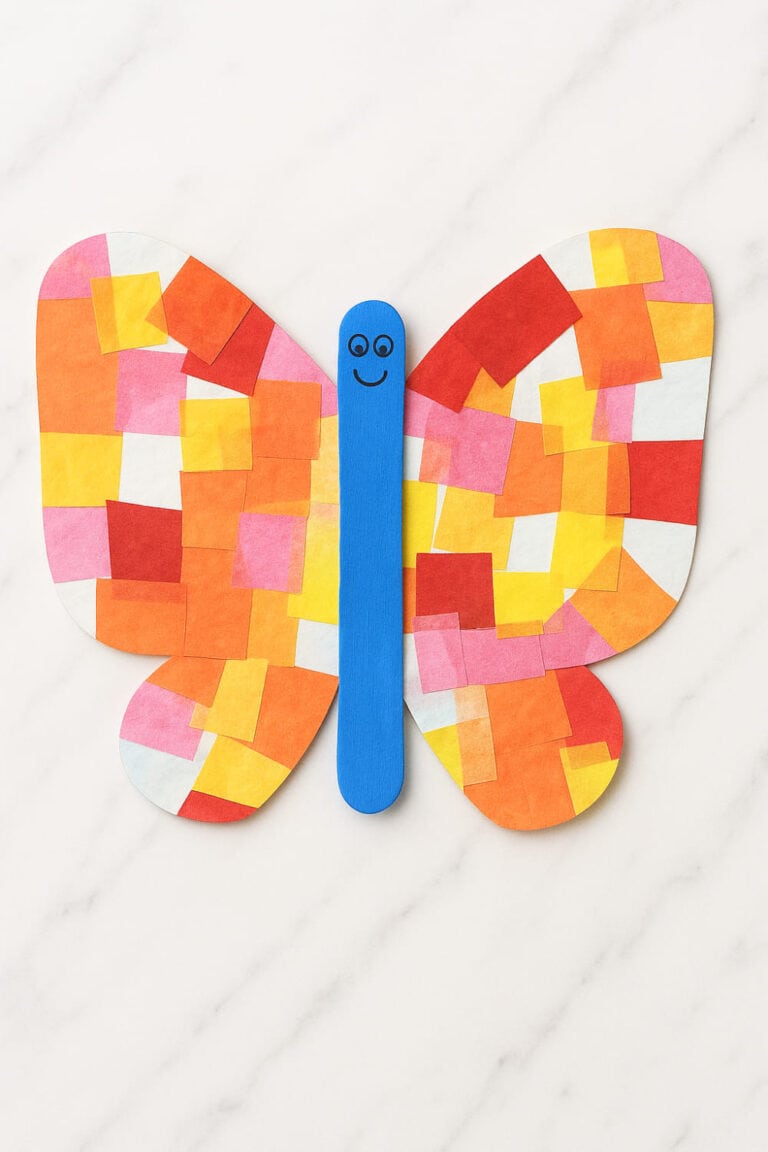
What a cute butterfly craft for a spring craft!
You’ll need a paper plate, colorful tissue paper, a jumbo popsicle stick, glue, scissors, and tape.
Start by drawing a line down the center of your plate, then sketch wing shapes on both sides.
Have kids cut or tear tissue paper into small pieces (great for fine motor skills!) and glue these colorful bits all over the wings.
Once dry, cut out the wings, draw a face on one end of the popsicle stick, and attach everything together with tape or glue.
7. Rain Art
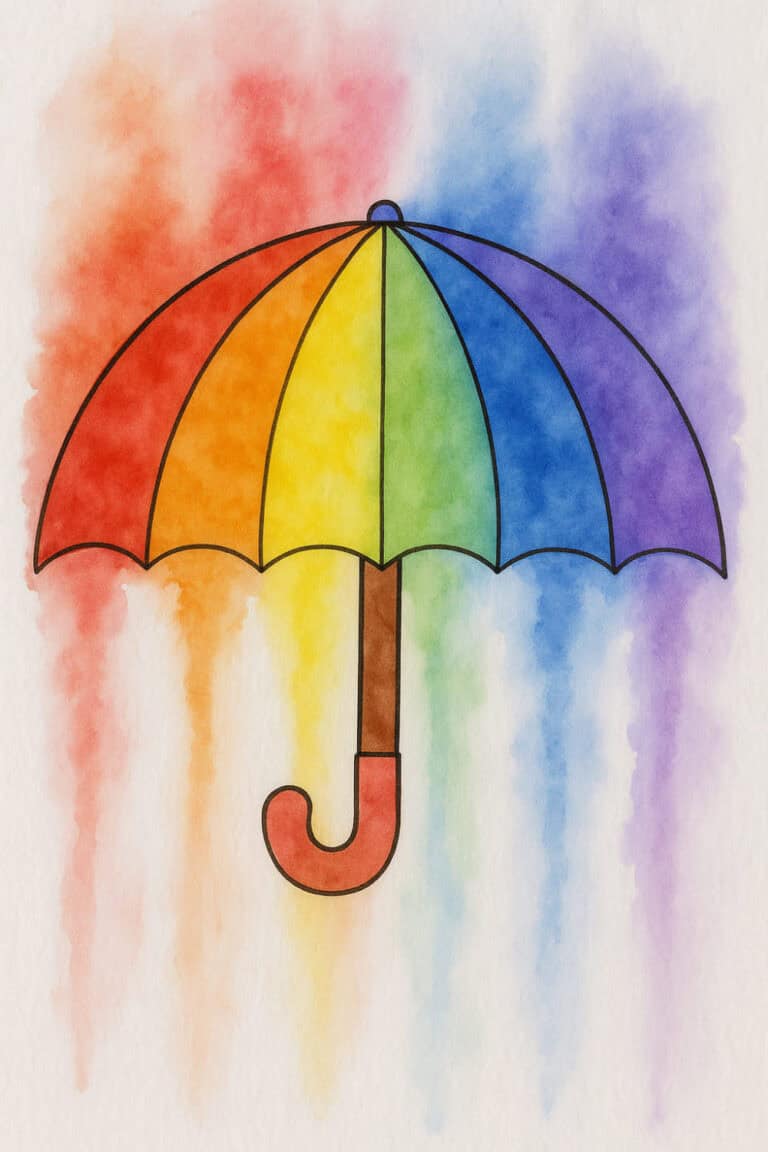
Turned a rainy day disappointment into creative fun with this simple umbrella art!
Just print an umbrella outline, have kids color it with washable markers, then clip it to a clipboard and place it outside in the rain.
The magic happens when raindrops hit the paper, making the colors run and blend in beautiful patterns.
Just don’t leave it out too long or the paper might tear! Perfect for those days when soccer practice gets canceled and you need a quick activity that feels like playing in the rain without getting soaked.
8. Pom Pom Sheep Spring Craft

This pom pom sheep craft saved me during last week’s rainy afternoon!
Pour white paint onto a plate, then let kids use a pom pom to stamp a circle for the sheep’s body.
Fill it in with more pom pom prints (great for fine motor skills!).
For toddlers who hate messy hands, use a clothespin to hold the pom pom.
Cut out a black head and legs from construction paper, then add white circles with black dots for eyes.
They look adorable hanging on our refrigerator art gallery, and grandma loved receiving one as a handmade card.
Simple, low-mess, and keeps kids happily occupied for at least 15 precious minutes!
9. Flower Suncatcher
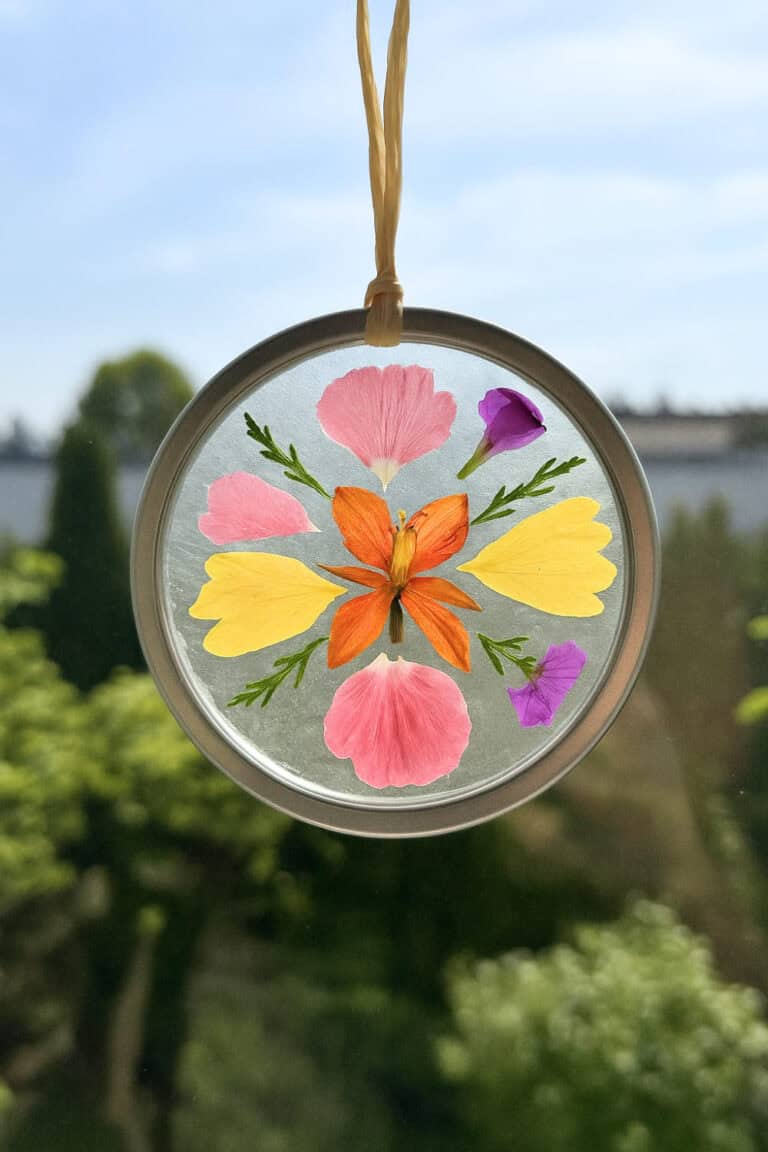
These flower suncatchers saved a rainy afternoon after soccer practice got canceled!
You’ll need clear contact paper, wide-mouth canning jar rings, twine, scissors, and fresh flowers or leaves from your yard.
Have kids trace the jar lid onto contact paper twice and cut out circles (I pre-cut for the youngest).
Peel the backing off one circle, place it sticky-side up in the jar ring, and let kids arrange flower petals and leaves on the sticky surface.
Once they’re happy with their design, carefully place the second contact paper circle (sticky side down) on top to seal everything in.
Attach twine to the jar ring for hanging, place your sealed flower design inside, and hang in a sunny window!
The way the light shines through transforms simple backyard flowers into magical stained-glass art that even impressed my husband!
10. Paper Doily Bunny Spring Craft
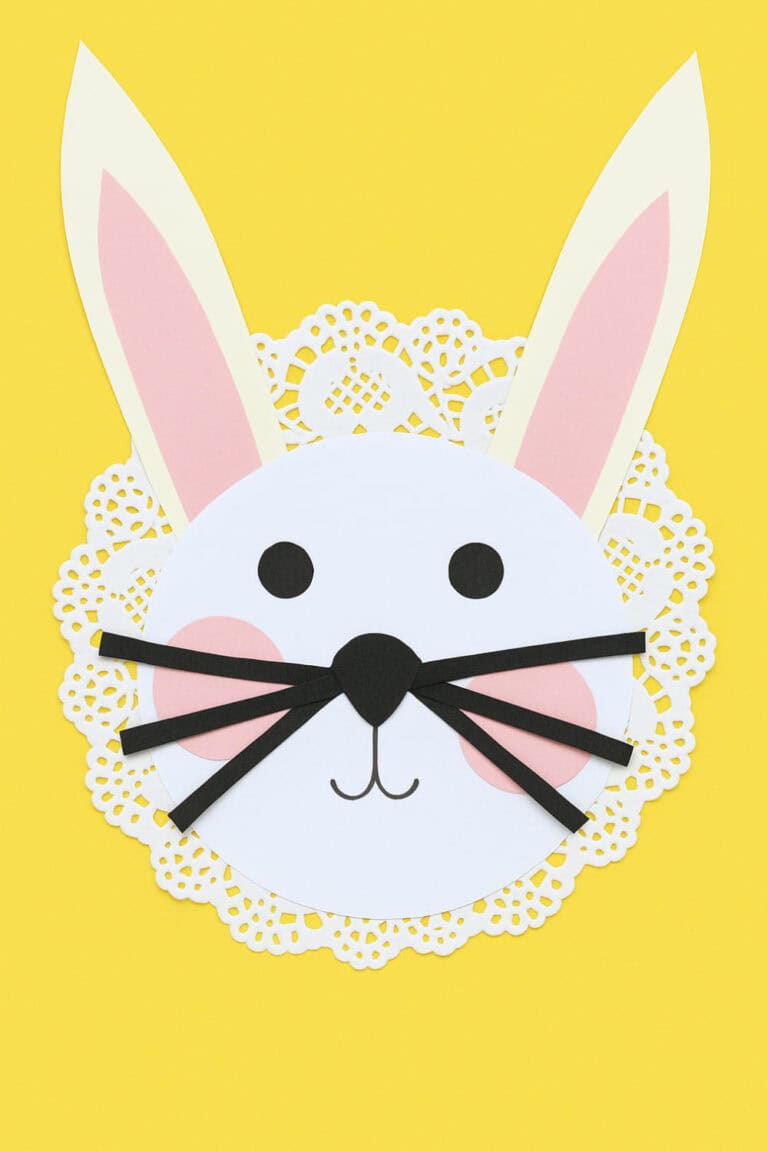
I love paper crafts because most of the time you have all the materials for it!
For this spring craft you only need basic supplies: a paper doily, white/pink/black paper, scissors, glue, and a black pen.
Start by cutting bunny ears from white paper (card stock works best so they stand up), then cut slightly smaller pink inner ears to glue inside.
Attach the completed ears to the top of your doily. Cut a small black nose, whiskers, and eyes from black paper, plus tiny pink circles for cheeks.
Glue these facial features onto your doily and draw a simple mouth with black pen.
My twins, when they were toddlers, just loved bunnies and for this made three different bunnies with various expressions.
These cute bunnies make perfect spring decorations and take less than 15 minutes to complete.
11. Spring Painted Pots
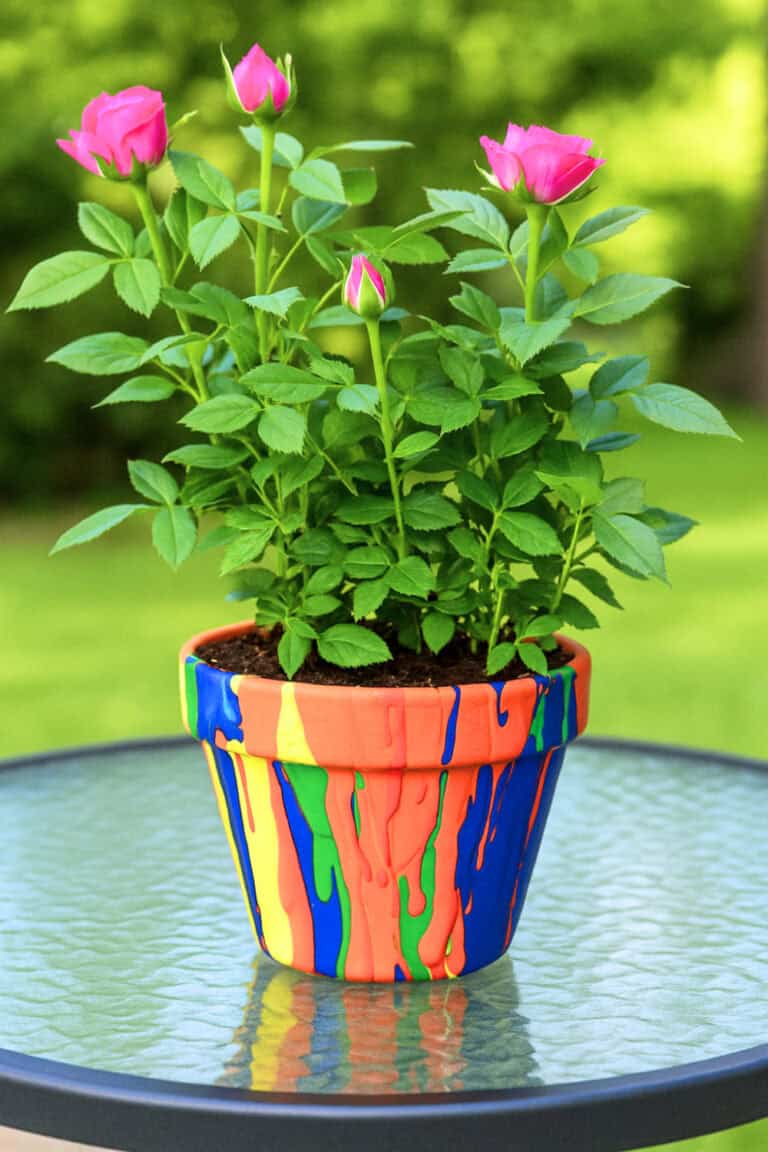
What a cute spring craft for toddlers to do!
You’ll need terracotta pots, masking tape, an old cooling rack, and acrylic paints in various colors.
Start by covering the drainage hole with masking tape (we put it on the inside). Place the pots upside down on a cooling rack over newspaper or an old tablecloth – trust me on the mess protection!
Let the kids pour different colors of paint over the bottom of the pot, watching it drip down the sides in beautiful rainbow patterns.
Depending how much paint you use, they’ll need 1-3 days to fully dry. Once dry, add a small plant or succulent.
These make perfect gifts for grandparents, teachers, or sports coaches.
12. Paper Bee Craft
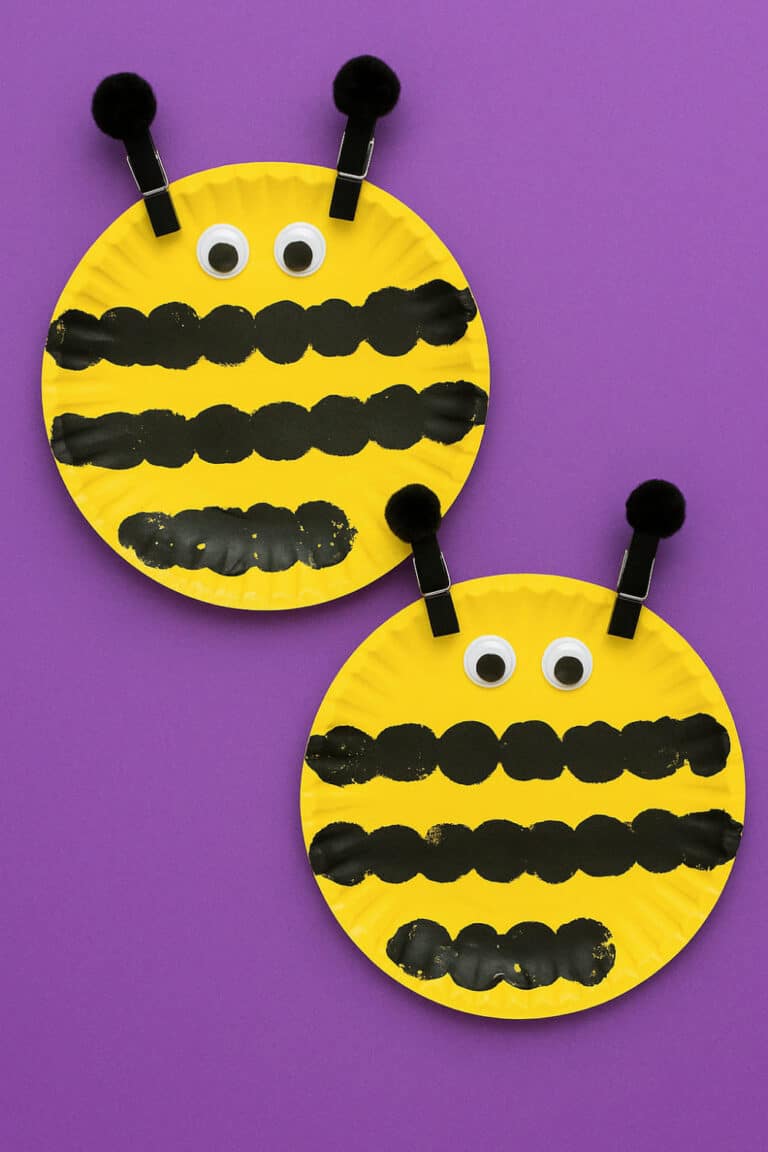
Looking for a simple craft that even toddlers can handle?
These paper plate bees were perfect for keeping the youngest busy while her sisters were at soccer practice! You’ll need paper plates (white or yellow), yellow and black paint, pom poms, wooden clothespins, googly eyes, and glue.
Paint the paper plate yellow if it isn’t already and let it dry completely.
Clip a black pom pom with a clothespin and use it as a stamp to create black stripes across the bottom half of the plate, leaving the top yellow for the face.
Then paint two wooden clothespins black (or use black ones if you have them) and glue a small black pom pom to the top of each for antennae.
Once everything’s dry, attach googly eyes to the yellow section and clip the “antennae” clothespins to the top of the plate.
Perfect for little hands and minimal mess!
13. Flower Craft Activity
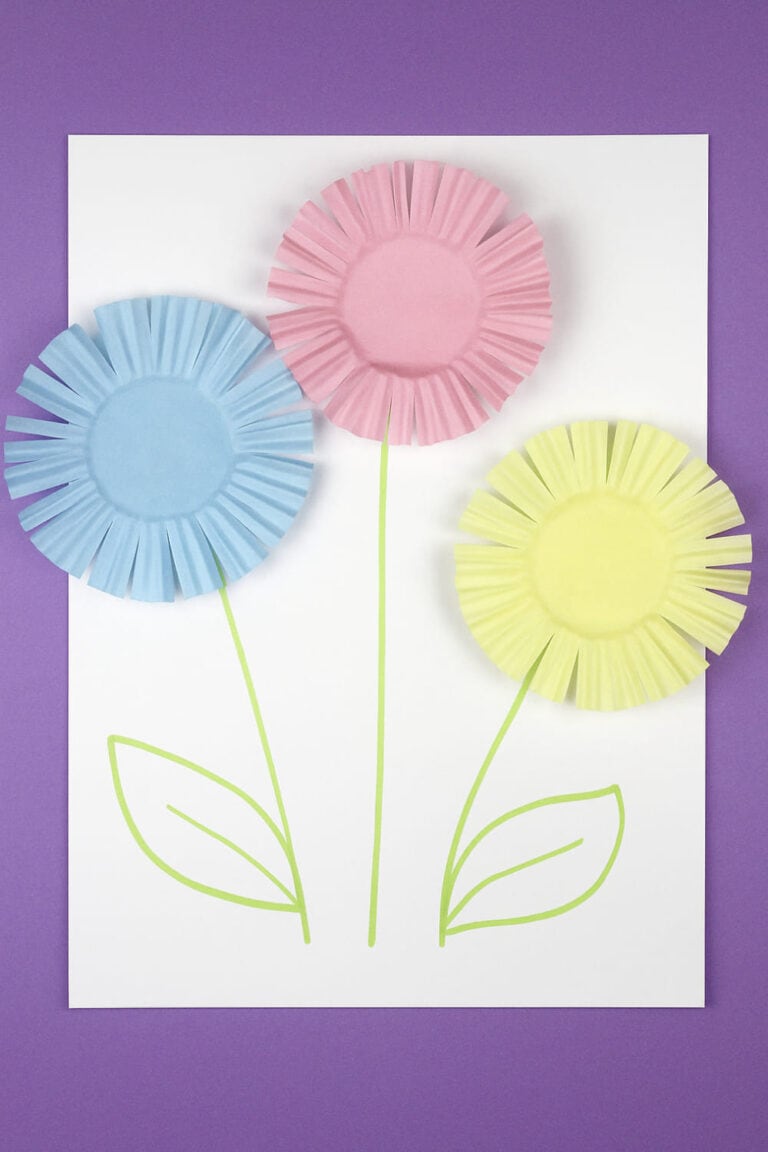
You only need cupcake liners (the colorful paper ones), pen, paper/card, glue, and kid-friendly scissors.
Start by having kids draw simple flower stems and leaves on their paper.
Then comes the fun part: cut around the edges of the cupcake liners to create petal shapes.
I love that there’s no wrong way to do this, some petals can be pointy, rounded, or completely random.
Gently flatten the cut liners and glue them onto the stems.
For extra pizzazz, add mini pom-poms, stickers, or even sunflower seeds to the centers. These make adorable spring cards for grandparents, and they take just minutes to complete with minimal mess.
14. Paper Bag Butterfly
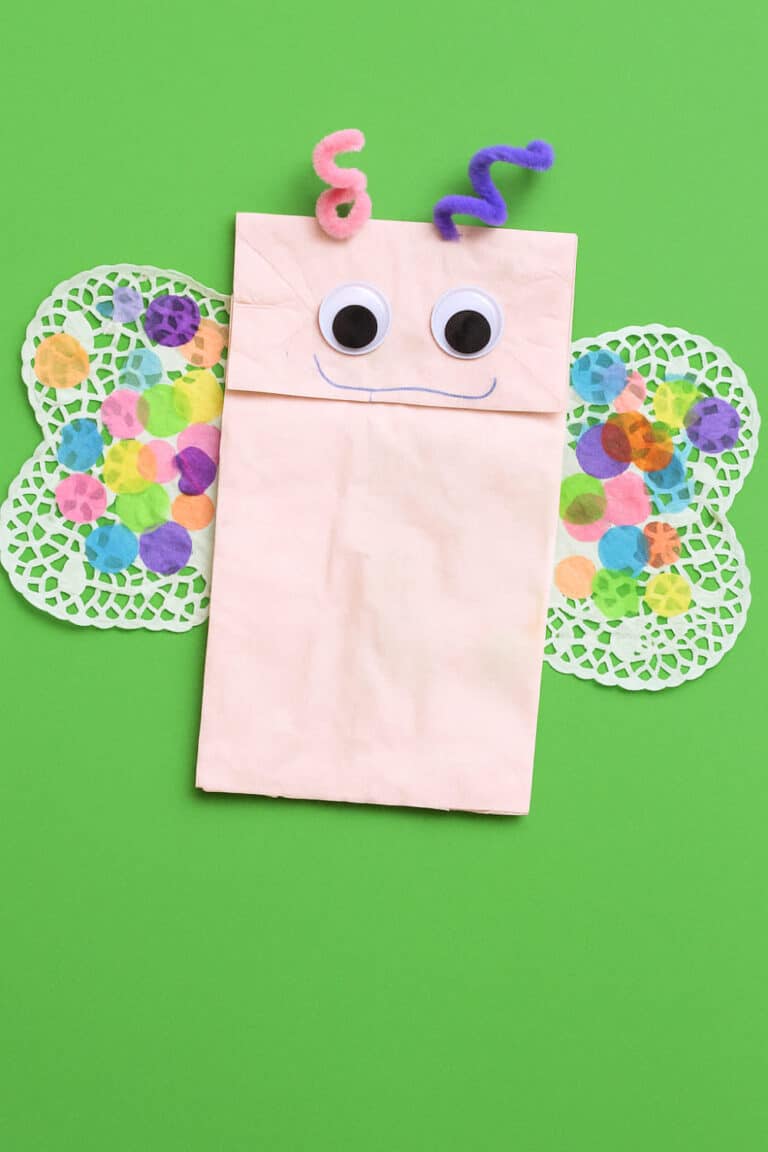
This paper bag butterfly craft kept the twins happily occupied during lazy spring days.
You’ll need a white paper lunch bag, acrylic paint, two heart doilies, dot markers, a paintbrush, pipe cleaner, black marker, googly eyes, tape, and glue.
Paint the entire paper bag any color your child chooses.
While the paint dries, have kids decorate the heart doilies using dot markers.
Once everything’s dry, fold about an inch of each doily to create a straight edge and glue these to the inside front flaps of the bag to create wings.
Add googly eyes to the front of the bag and draw a simple smile underneath.
For the finishing touch, curl pipe cleaner pieces around your finger to create springy antennae and tape them to the back of the bag.
15. Cherry Blossoms Craft
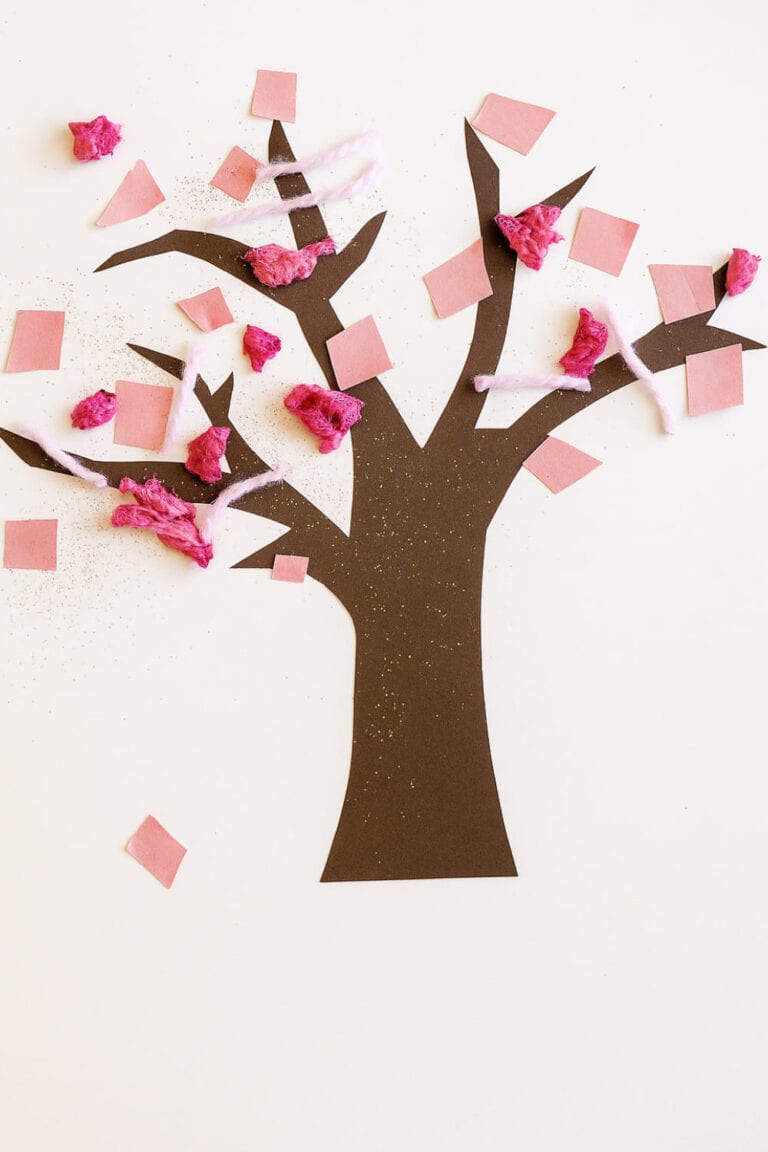
Loving this spring craft!
You’ll need white paper for the background, brown paper for the trunk, pink paper/tissue paper/yarn for blossoms, scissors, glue, and optional glitter for sparkle.
Start by cutting a tree trunk and branches from brown paper.
Glue the tree trunk onto white paper, then comes the fun creative part!
Let kids tear or cut the pink materials into small pieces to create blossoms.
For extra sparkle, add a sprinkle of pink glitter (if you’re brave enough to deal with the inevitable glitter aftermath).
These make beautiful spring decorations for the fridge or to send to grandparents.
16. Paper Sunflower
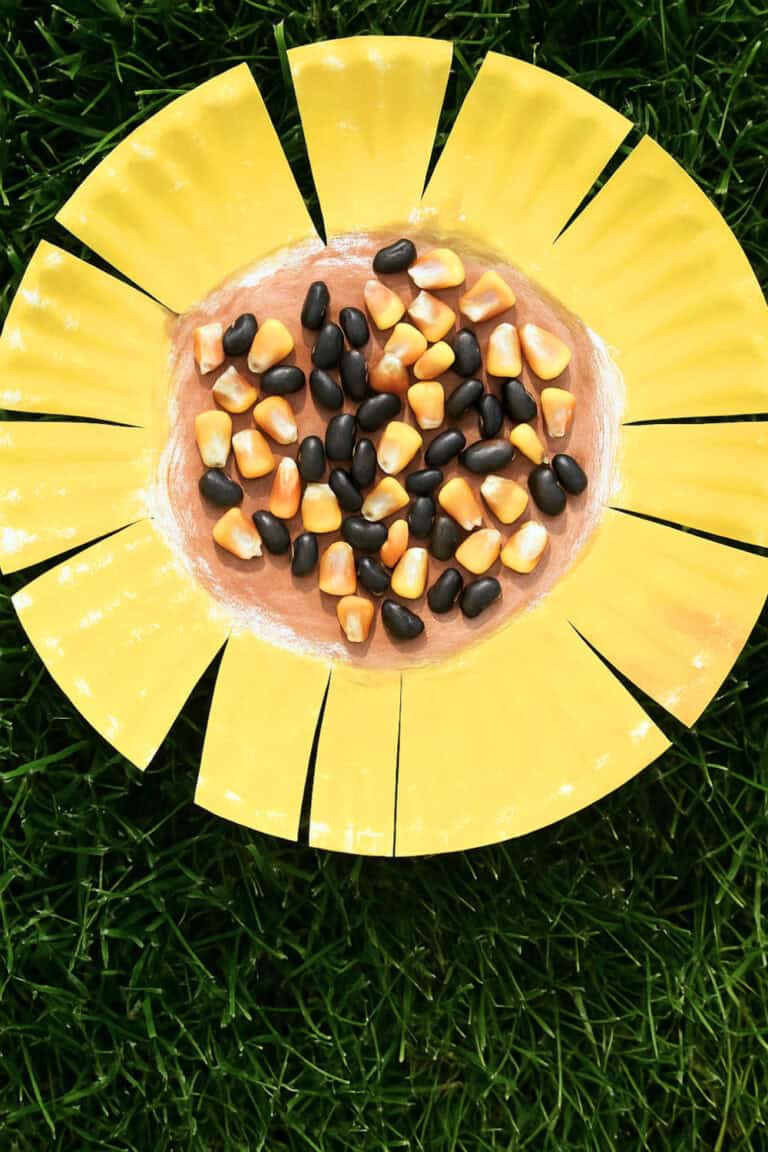
This paper plate sunflower craft was perfect for keeping the twins busy when there was nothing to do in the afternoon!
You’ll need paper plates, yellow paint (several shades if possible), brown paint, glue, coffee beans, corn kernels, and scissors.
Have kids paint the outer rim of the plate with yellow paint.
Once the yellow rim is complete, paint the center of the plate brown.
After the paint dries, add texture by gluing coffee beans and corn kernels all over the brown center – this sensory element makes these sunflowers extra special.
The final step is cutting notches around the rim to create petals.
17. Cork-Stamped Hyacinth
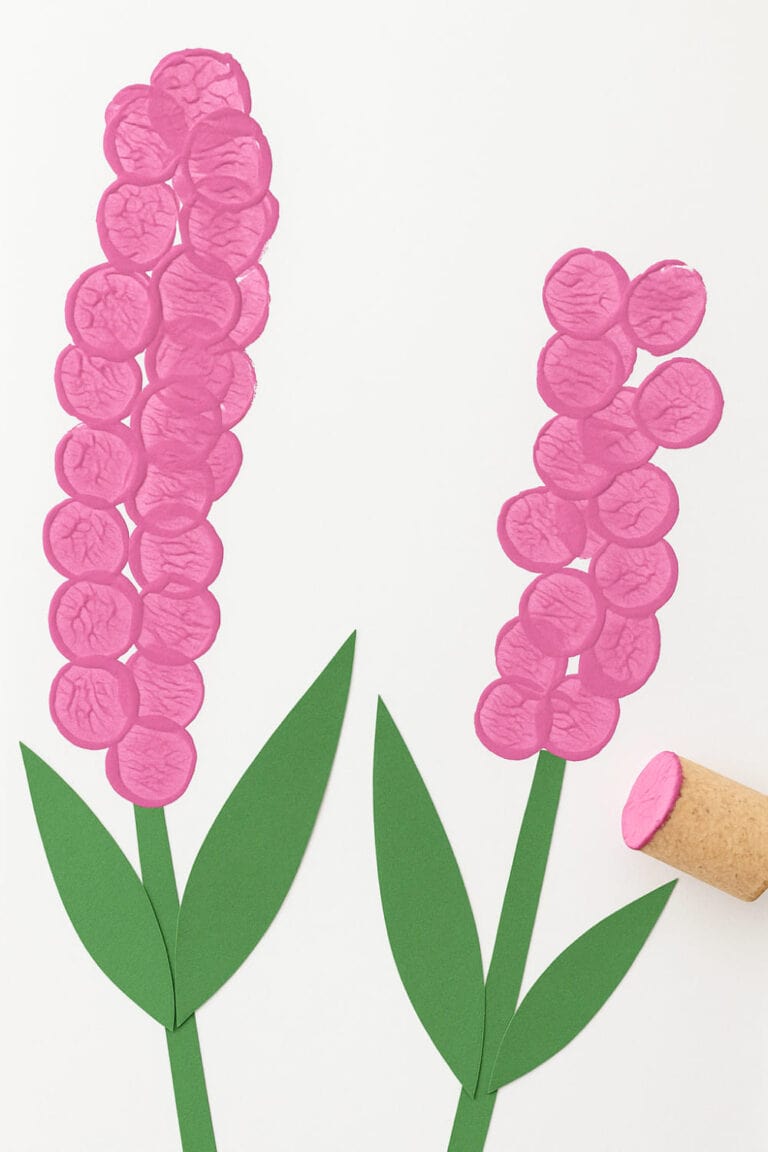
You’ll need a wine cork (I save them for crafts), pink or purple paint (though any color works), white cardstock, green construction paper, glue, scissors, and a paper plate.
Start by cutting strips of green paper for the stem and glue them onto the white cardstock.
Then cut simple leaf shapes and attach them on either side of the stem.
Pour some pink or purple paint onto a paper plate, dip the end of the cork into it, and start stamping!
The trick is to create a cluster of dots around the stem that gets wider at the top, mimicking the shape of a real hyacinth flower.
These make beautiful spring cards for grandparents or teachers, and they’re so simple that even preschoolers can create something truly frame-worthy.
18. Sponge-Stapmed Ladybugs

What a cute spring craft for your toddler!
You’ll need sponges, red paint, paper plates, scissors, black construction paper, glue, a black Sharpie, black paint, white cardstock, and googly eyes.
Cut a sponge into a circle shape (I use the bottom of a cup as a template).
Pour red paint onto a paper plate, dip the sponge into it, and press firmly onto white cardstock to create the ladybug’s body.
Make several ladybugs across the page.
Once the red paint dries, cut small pieces of black construction paper for the heads and the dividing line down the middle of the wings.
Glue these onto each ladybug, then add googly eyes to the heads. Use a Q-tip dipped in black paint to add spots to the wings, and finish by drawing legs and antennae with a black Sharpie.
19. Frog Craft
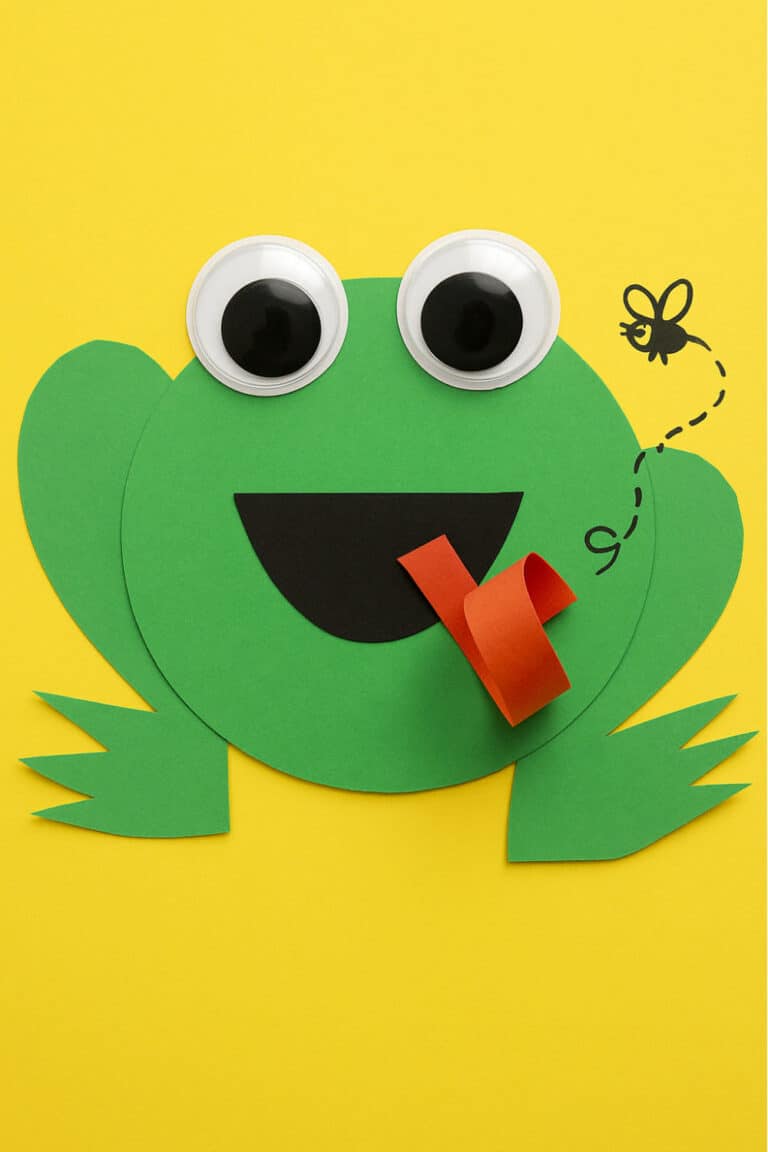
For this spring craft you’ll need green, black, and red construction paper, googly eyes, glue, scissors, dot stickers/markers, and a pencil.
Start by tracing a CD or small bowl onto green paper to create a perfect circle for the frog’s body.
Cut out a heart shape from the same paper, then cut it in half – these become the frog’s legs when glued to either side of the circle.
Cut simple webbed feet and attach them to the bottom of each leg.
From black paper, cut a small curved smile and glue it to the circle.
Add googly eyes.
For the finishing touch, cut a long strip of red paper for the tongue, curl it around a pencil to give it that spring-like shape, and glue it coming out of the frog’s mouth.
Add nostrils and even a little fly around the frog with a marker and decorate with dot stickers or markers for spots.
These simple frogs take less than 10 minutes to make but kept the twins happily crafting much longer.
20. Hatching Chick Paper Craft
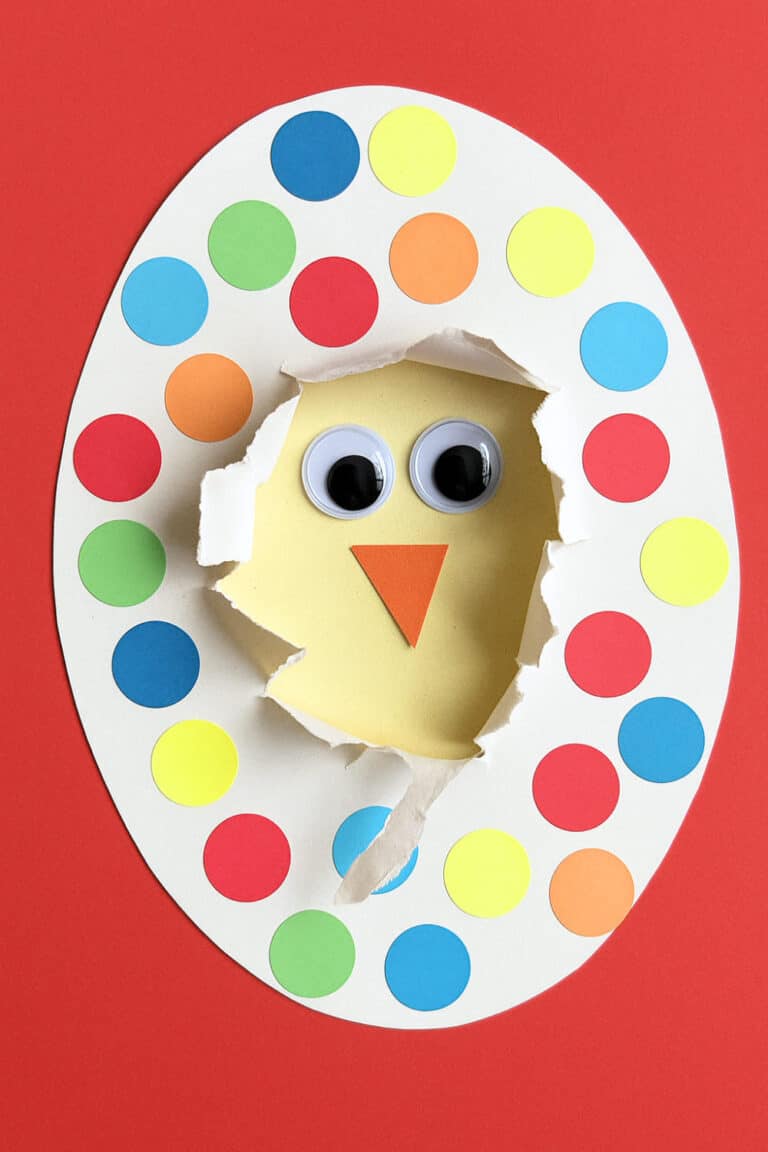
This hatching chick craft is so easy for your toddler to make!
You’ll need white, yellow, and orange construction paper, glue, dot stickers, scissors, and googly eyes.
Start by cutting egg shapes from both yellow paper (for the chick) and white paper (for the shell).
Fold and cut a small opening in the white egg, then glue it on top of the yellow one, leaving the cut area free.
Gently tear the edges of the cut outward to create a “hatching” effect, then add an orange triangle beak and googly eyes peeking through the opening.
Finish by decorating the shell with colorful dot stickers.
These take just minutes to make but look absolutely adorable hanging on our spring craft display!
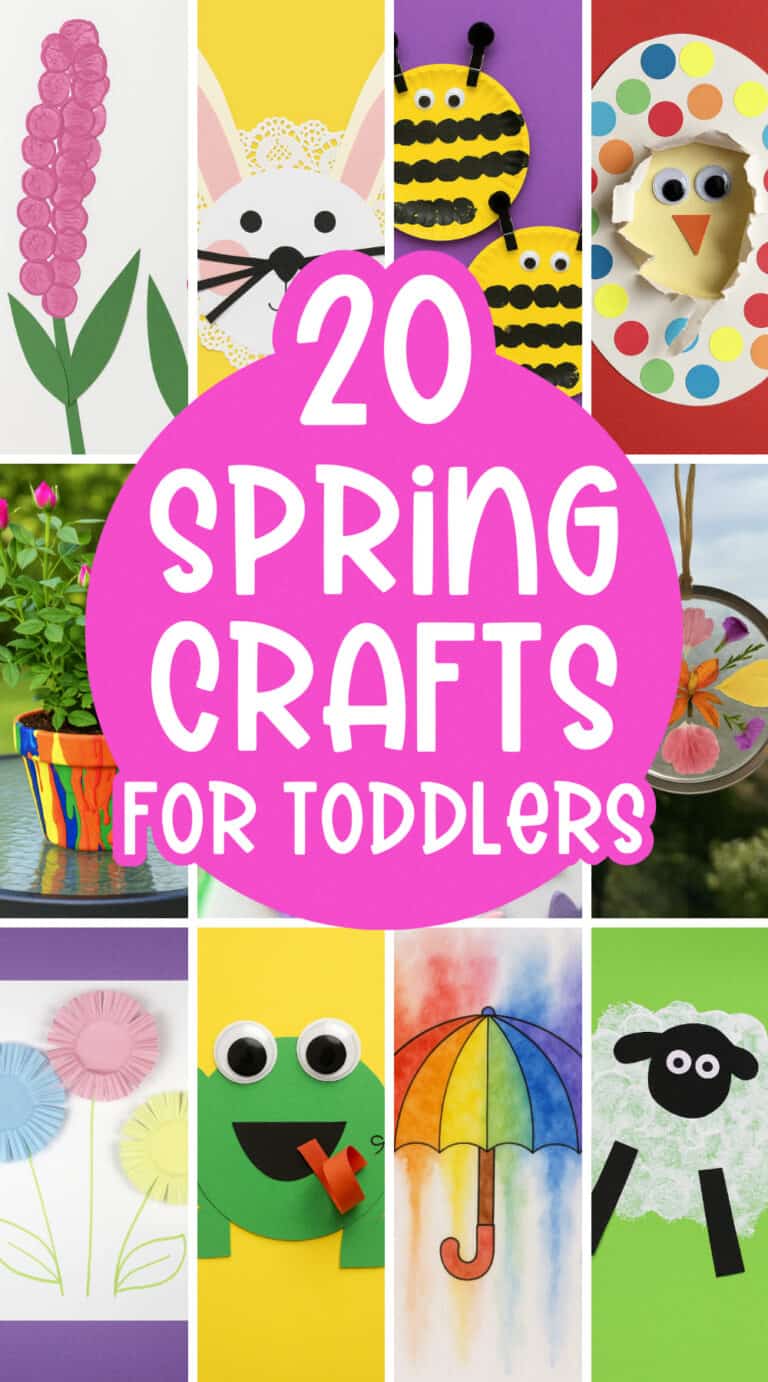
Spring Crafts for Toddlers
I hope you found some easy and fun toddler crafts for spring! When it’s raining or just blah outside, try these spring crafts!
For more kid activities, make sure to follow me on Pinterest!

Leave a Reply